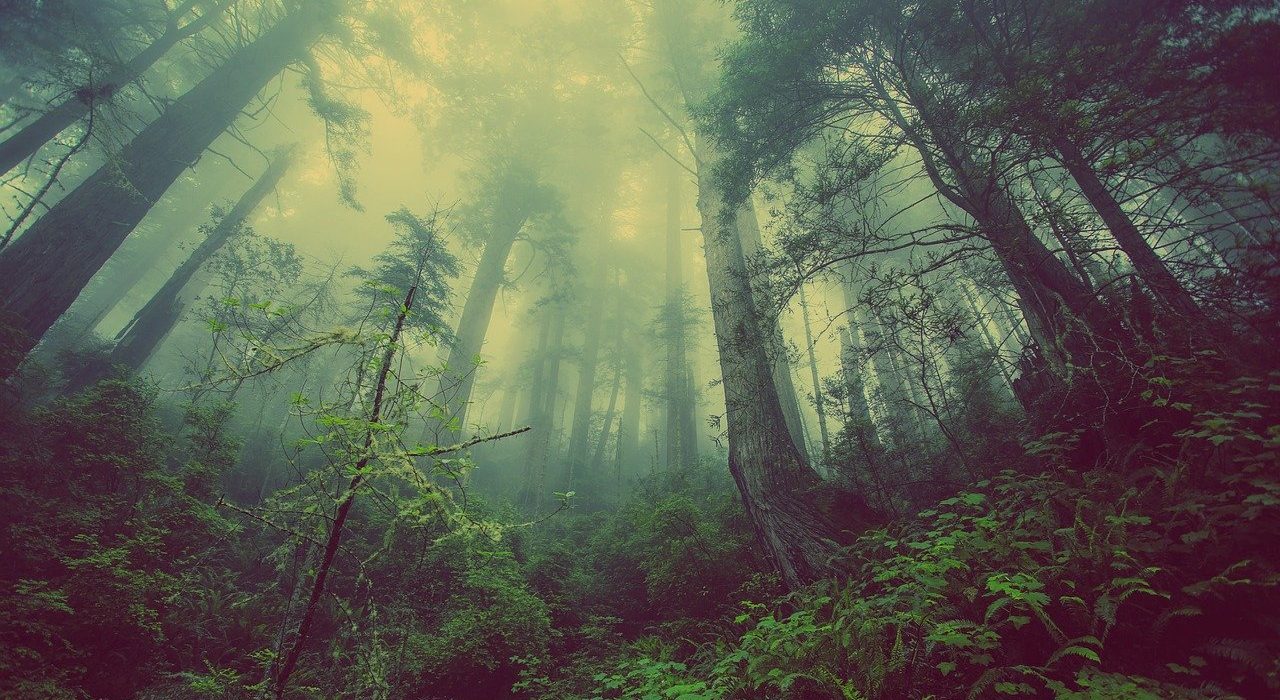
Mystical forest pictures live from mysterious light moods, which only partially illuminate the dark forest and thus leave a lot of room for the own imagination.
Does a dwarf look out from behind the root, does a goblin come out of the undergrowth? In this article I will show you how to “predict” these light moods, how to photograph them and how to optimize them in postproduction.
How is a mystical lighting mood created?
The “mysterious” lighting moods are decisive for mystical forest pictures.
These are created when direct sunlight is filtered and modelled through fog of varying density. These are the ingredients, so to speak: Fog + sun + sun position (low) = mystical light mood.

Personally, I find a low-lying sun most interesting, here the ray effects of the sun are particularly obvious. That means: after sunrise and before sunset. Fog in the early morning hours is more likely than in the late afternoon.
Light ground frost with ripe cobwebs would be another nice accessory.
How do I know when these light moods are present?
Local knowledge and a weather app will help. Use the weather app to check for fog, use Google Earth to research the terrain and altitude and compare this information with the weather reports.
With time you get a “feeling” for the local weather conditions and whether you can expect mystical light moods.
However, you only have a limited time window, because sunshine and fog – especially the fog density – change constantly and, depending on the weather, also very quickly.
Which forest is suitable for this?
Actually any forest, if the lighting mood is right. The more of the following ingredients it has, the more intense the mystical light mood becomes:
- very young and very old trees standing close together or in groups
- loose undergrowth with dead branches and tree remains
- Cobwebs
- Moss soil
- Forest clearings
- interesting forest edges
A search in Google Earth to locate forest clearings, forest ponds and winding paths shortens the search for a suitable shooting location on location. But it can be just as much fun to go off without any research at all and be surprised.
I enjoy both, I orientate myself roughly via Google Earth and then explore the surroundings on foot. For me, this is actually also part of forest photography.
Which location and which composition are suitable?
In order for the sun’s rays to be shown to their best advantage, the sun must be able to penetrate the forest to some extent. This works very well at the edge of the forest and above a forest clearing.
These are the first places to start, so just walk along a forest path and when it gets interesting, dive into the forest and try out different positions, perspectives and compositions.

Like for example only the lateral rays without sun or directly from the front. When you take photos into the sun, you should not look through the viewfinder directly into the sun at full zoom – this can be dangerous for your eyesight.
At 24 mm this is less dramatic, but I always pinch the eye a bit or use Live View for composition and switch back to “viewfinder” mode before shooting.
Lateral sunlight
What makes a forest even more mystical are cobwebs in the picture, ideally covered with light hoarfrost or dew drops.
Small dead branches that stretch their gnarled fingers into the picture, tree stumps that are already partly rotting and covered with moss, anthills and fallen tree trunks whose branches defend the trunk like spikes.
These details are another element to give the picture something mysterious.
Even with diffuse sunlight, atmospheric pictures emerge, here of a forest clearing with young trees covered with cobwebs, which only become visible through the dew drops.
Interesting are constellations of very young trees and very old (tall) trees. The background gets lost in fog and darkness, here I had a diffuse sun in my back
Different tree species and plants in combination result in beautiful colour contrasts – “foggy” blue background, green-yellow forest soil and orange plants.

To get a good depth of field, I like to use an aperture between F/8 – F/12. To use these aperture values in a dark forest, the exposure time will be in the range of seconds.
To get a blur-free image, a tripod is necessary. The alternative would be to increase the light sensitivity of the sensor and raise the ISO value, but this gives an unpleasant noise, especially in the dark tones.
A disadvantage of long exposures is the motion blur of thin branches when the wind blows. An advantage is that the fog appears even denser.
With the focal length I change according to the idea of the picture. If I want to show very close tree trunks, I zoom to 100mm to “condense” the tree trunks optically.
Image editing
In order to reproduce the different contrast gradations from very hard to very soft, I edit all RAW files in Lightroom and Photoshop.
Lightroom:
In Lightroom I work out the contrasts, tonal values of the individual colors and a general color mood. For the contrasts and tonal values, these are the basic adjustment controls and the gradation curve settings.
In order to emphasize certain colour tones more strongly and to soften slight light reflections in the grass, I use the luminance controls of the colours and make orange, yellow and green darker.
To support the mystical mood of the fog, I use the partial toning. Here I give the lights some “yellow coloration” and the shadows some “blue coloration”.
Photoshop:
To reproduce the fine structures of bark, leaves, needle and moss, I sharpen only certain areas of the image in Photoshop using masks with different techniques.
At the end, depending on the image, there is a complementary color look over the image, this emphasizes the mystical mood to my taste and a vignetting, i.e. darkening of the edges to direct the view more to the “main motif”.